Creating a Work Invoice
Work invoices are created using contractors' time entries. Follow the step-by-step instructions in this article to learn how to create work invoices in Landboss.
After time entries have been approved (see more at Reviewing Time Entries), you can then create work invoices for your prospects.
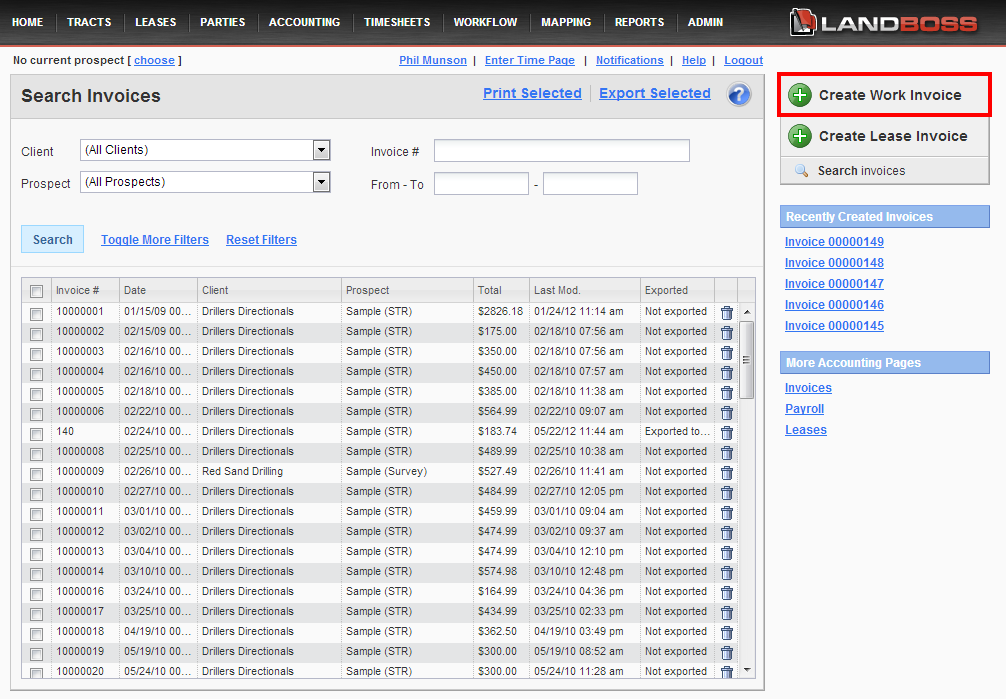
1. Click on the Accounting button from the menu bar

2. Click on Invoices
3. Click on Create Work Invoice
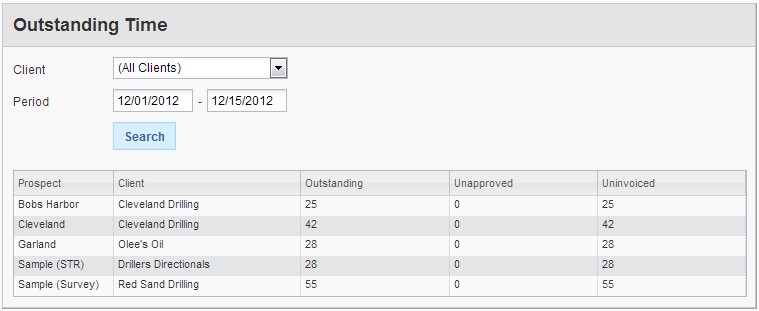
4. Select the Prospect for which you would like to create a work invoice
Use the fields at the top of the page to choose the Client and Period you would like to invoice. After clicking Search, the list of Prospects that meet those parameters will be displayed in the results grid below. There are three columns: Outstanding, Unapproved, and Uninvoiced.
-
Outstanding refers to the total number of time entries that are unapproved and uninvoiced; the total of the Unapproved and Uninvoiced entries will be equal to the Outstanding entries
-
Unapproved is the number of time entries that have not been marked as approved by all time reviewers
-
Uninvoiced refers to the time entries that have been approved, but have not yet been invoiced
Click anywhere on the line item of the Prospect you'd like to create a work invoice for.
5. Enter invoice information and Search and Select Timesheets to Invoice
On the Step 1: Enter Invoice Information, enter the [1] Invoice Date, [2] Terms, and [3] Invoice Number.
- Invoice Date: this is the date that is displayed on the invoice
- Terms: Using the drop down menu, you can select either (None), Due on Receipt, NET 15, NET 30, or NET 60. If you select (None), the Terms will not appear on the invoice
- Invoice Number: This is the invoice's number in Landboss; it is set to automatically increment when each invoice is made, but you can enter a custom invoice number if desired
If you export your invoices to QuickBooks, you can choose to replace Landboss's invoice number with the next invoice number in QuickBooks during the export process.
On Step 2: Specify Billing Period, enter the beginning and ending period of the Billing Period for this invoice.

On Step 3: Add Filters (Optional), you can choose to invoice time and expenses for a single contractor or a particular work code (or both).
Lastly, on Step 4: View Timesheets (Optional), you can view the timesheets that will be sent to the invoice generator configured for the client.
The invoice generator, also known as the invoice format, can be configured on the Accounting Setup screen for a client and allows further control over how an invoice is generated. For instance, some generators will split the time and expenses up on multiple invoices, making one for each PLSS.
7. Click Create Invoices
Only approved entries within the selected billing period will be invoiced. Any unapproved entries in the selected billing period will be skipped.
Comments
Be the first to post a comment