Entering Time and Expenses
Entering time and expenses into Landboss is straightforward. Follow the step-by-step instructions in this article to learn how, or watch the training video to learn how to enter time, view timesheets, edit/delete time entries, as well as how to print or export your timesheets.
1. Go to the Enter Time Screen
To access the Enter Time screen, click on the Enter Time Page link located in the upper right corner of the screen next to your name, or click on Timesheets in the main menu and then click the Enter Time button in the subnav at the right.
.png)
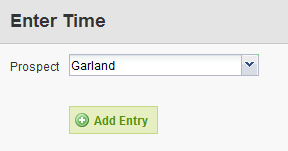
2. Select the Prospect
Select the prospect in which you were working, then click Add Entry.
Note: Users with appropriate administrative permissions will see more options here.
3. Specify the Date and Specific Location
You’ll now see the Add Timesheet Entry window. Begin by entering the date you performed the work and the location you performed the work for. Entries can be made for the entire prospect, a single county, a specific PLSS section, and/or tract.
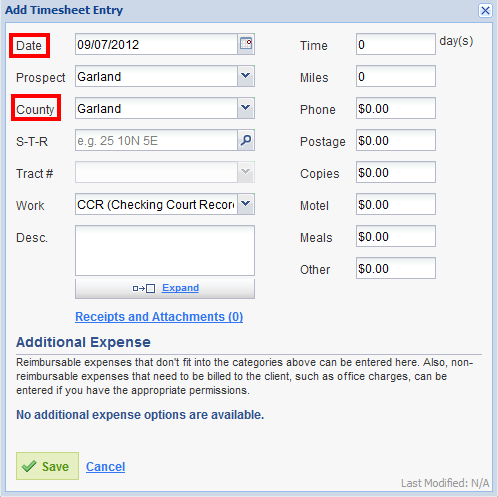
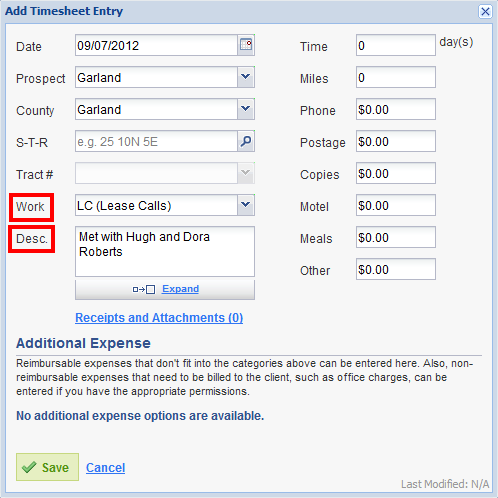
4. Specify the Work Performed
Next, from the Work drop down menu, choose the Work Code that represents the activity you were performing. Write a more detailed description of the work performed in the Desc. field, below.
5. Enter Length of Work and Expenses Incurred
Enter the time spent performing the work in the Time field. Timesheet entries can be entered as a decimal for any portion of five days; for example, if you worked on one task for two hours, you'd enter 0.25 in the Time field to specify 1/4 of an 8 hour work day. You can also enter values greater than 1, so if you worked 10 hours on the task, you could enter 1.25. Next, enter mileage and any expenses incurred while doing the work. If made available by an administrator, additional expenses that do not fit the standard categories can be added by using the Additional Expense drop down menu at the bottom of the window.
6. Upload Receipts
If you enter any expenses, you will be reminded to attach receipts, which is much like attaching files to an email. To upload and attach receipts to this time entry, click on the Receipts and Attachments link beneath the Notes box. In the window that is displayed, click on the Upload a File link, find the receipt file on your computer, and click Open. Click Finished when you’ve uploaded all of the receipts.
Note: Attachments must be in .tif, .tiff, .jpg, .jpeg, .gif, or .png format. Learn more: Why can't I upload PDF receipts?
7. Save
Once you have finished your time entry, click the Save button and your time entry will be saved and automatically sorted to the correct timesheet for you.
Comments
Be the first to post a comment